Flawless Remote Development With Any JetBrains IDE
JetBrains builds what I believe are the best programming IDE's out there. However, anyone who has tried their remote development solutions such as Gateway or Code With Me knows they are buggy and unreliable.
After many months of experimenting, I finally found a way to run any JetBrains IDE such as WebStorm and PyCharm remotely without any issues. The way to do this is using an amazing open-source software called X2Go. With X2Go, you can run your IDE as if it was a local application running natively with amazing performance.
In this article, I will show you step by step how you can set up your JetBrains IDE with X2Go. If you want more context on this method along with a quick demo of the setup process and how it works, check out my YouTube video.
What is X2Go?
X2Go is an open-source remote desktop software that allows you to run applications remotely. It works using X11 forwarding which in essence allows you to directly stream a X11 GUI from one machine to another.
X11 forwarding is typically slow and doesn't work well outside your local network. But X2Go uses the NX protocol which optimizes and compresses and X11 stream. By doing this, it achieves excellent performance for remote desktop streaming and works well even outside your local network.
X2Go uses a client-server model. The server runs on your remote machine is responsible for intercepting the X11 stream, applying its optimizations and then forwarding it to an X2Go client. The client is responsible for receiving the X11 stream and displaying it on your local machine.
Thankfully, the X2Go client is available on just about every operating system (Windows, macOS and Linux).
Remote machine requirements
You can utilize any computer or VM to run your JetBrains IDE remotely. This can be a cloud server, a local server or even a spare computer. In my YouTube video, for demo purposes, I used a VM provisioned in Google Cloud Platform using Ubuntu 22.10. For my business and personal projects, I use a dedicated in-house server running a VM using KVM/QEMU.
Operating system
The only requirement to make this work is that your remote machine runs a Linux operating system. The X2Go server supports many Linux distributions such as Ubuntu, Debian, Fedora, Arch and more.
SSH access
For X2Go to work, you will need to have SSH access to your remote machine.
Latency & connection
To achieve good performance remote development performance, you need to have a decent connection to your remote machine.
Latency
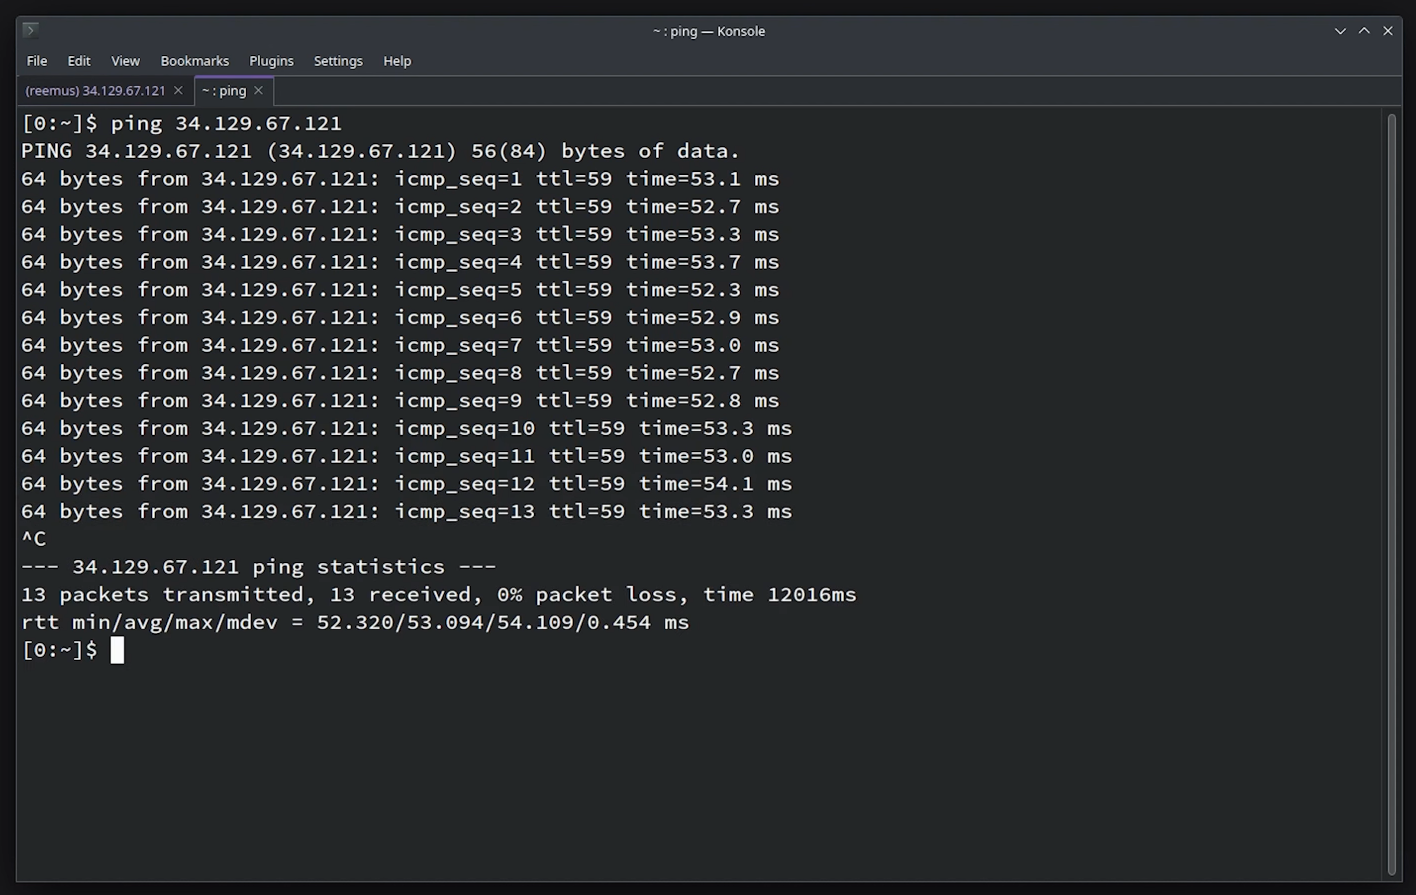
In terms of latency, I have found that having at least a 100ms latency between your local and remote machine will give you a good remote dev experience. Anything higher than 200ms and you will start notice some lag. You can verify your latency between your local and remote machine by using the ping <remote-ip> command in your local machine terminal
Connection Speed
Ideally, you should also have at least a 4Mb download and 2Mb upload connection speed to your remote machine. This will allow you to stream your IDE at 1080p resolution without lag. If you have a slower connection, you can still use X2Go but you may need to reduce you resolution and image quality settings.
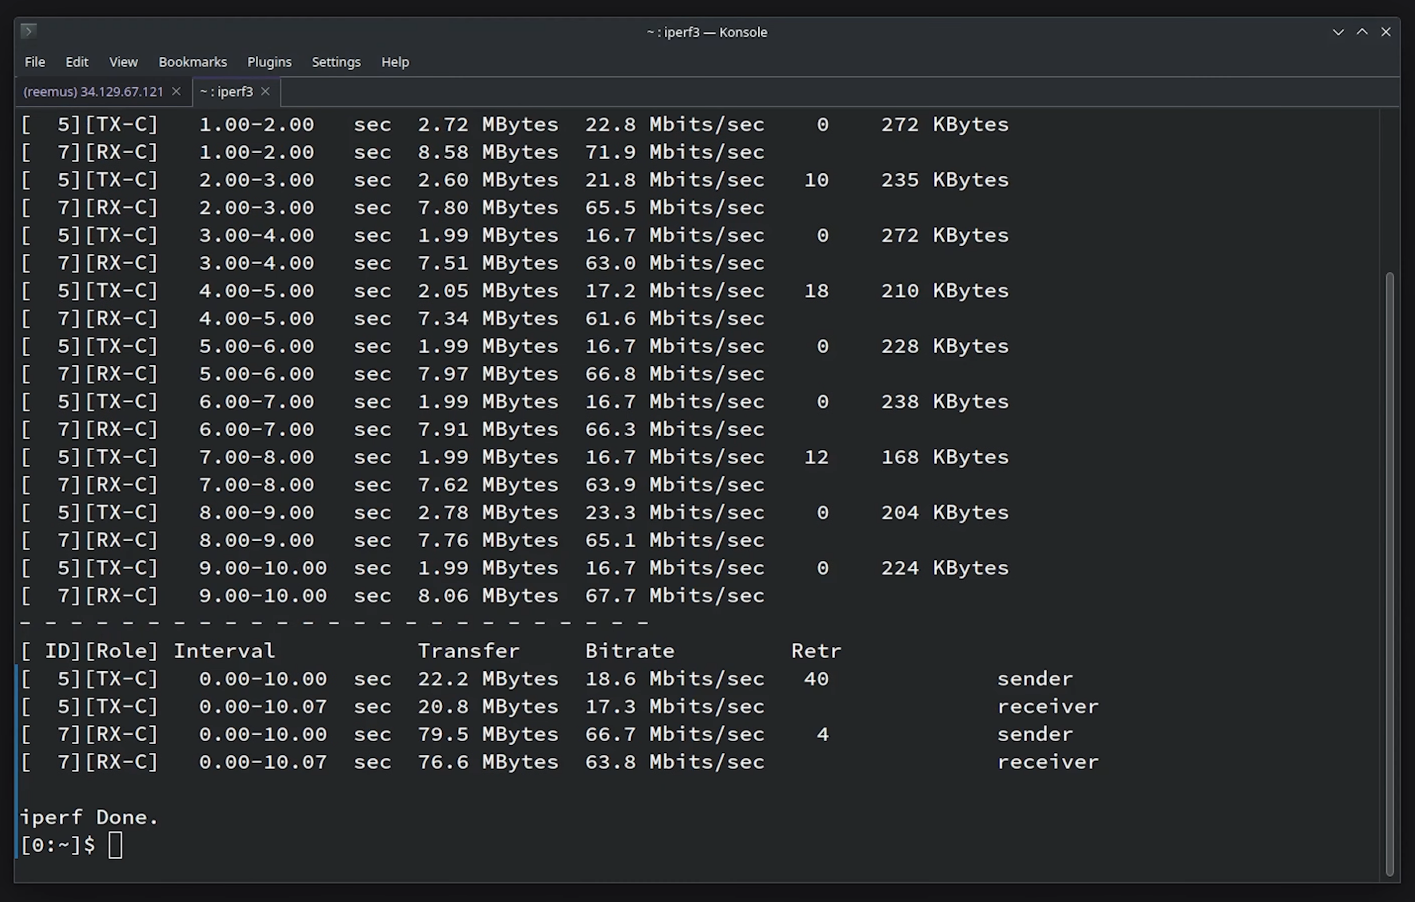
To test your connection speed, you can use a tool called iperf3. I recommend checking out my other article where I explain how to use iperf3.
Set Up Your Remote Machine
The following steps assume you are using Ubuntu as your operating system.
If you are using a different Linux distribution, you will need to adjust the
commands accordingly.
Configure SSH key access
First thing is to make sure you have SSH access to your remote machine. If you already have SSH access, you can ignore this step.
Keep in mind, some cloud providers like Google Cloud allow you to SSH into a VM using their CLI tools. This is generally not the same as having direct SSH access to your VM with your own SSH keypair. In this case, you will still need to properly set up SSH access.
If you don't have the open-ssh sever installed and running already, you can do that by running:
sudo apt install openssh-server \
  && sudo systemctl enable sshd.service \
  && sudo systemctl start sshd.service
Then to enable SSH access to your remote machine with your SSH keypair, copy your public key into the ~/.ssh/authorized_keys file on your remote machine. You can do this by running:
# Create the .ssh directory if it doesn't exist
mkdir -p ~/.ssh

# Edit the authorized_keys file and add your public key to it
nano ~/.ssh/authorized_keys
If you are not sure how to create an SSH keypair and get your public key, I suggest consulting a dedicated guide or tutorial on creating an SSH keypair (Google...).
After setting this up, you should be able to SSH in your remote machine using ssh <user>@<remote-ip> without having to enter a password.
Install base system utilities
This step is optional, but I find it helpful to install some base system utilities on your remote machine.
sudo apt-get update
sudo apt-get install \
  apt-transport-https \
  bind9-utils \
  ca-certificates \
  curl \
  dirmngr \
  dnsutils \
  ethtool \
  fontconfig \
  fonts-freefont-ttf \
  fonts-ipafont-gothic \
  fonts-kacst \
  fonts-noto \
  fonts-symbola \
  fonts-thai-tlwg \
  fonts-wqy-zenhei \
  git \
  gnupg \
  gnupg2 \
  inotify-tools \
  iperf3 \
  jq \
  libxss1 \
  lsb-release \
  net-tools \
  nfs-common \
  procps \
  rsync \
  software-properties-common \
  telnet \
  tmux \
  tree \
  unzip \
  wget \
  zip
Installing desktop environment & browser
For X2Go to work, you will need to install a desktop environment and a browser on your remote machine.
You can ignore this step if you already have an existing desktop environment (KDE, GNOME, etc...) and browser (firefox, Chrome, etc...). However, if setting this up on a VM, you generally won't have any existing desktop environment or web browser installed.
The browser, while not absolutely essential, is necessary when the IDE tries to open any web links, such as when you are activating your JetBrains license when first launching the IDE.
sudo apt install xfce4 firefoxInstall X2Go server
The X2Go server installation page has all the details for installing X2Go on different Linux distros. For Ubuntu, you can install X2Go by running:
sudo apt-get install software-properties-common \
    && sudo add-apt-repository ppa:x2go/stable \
    && sudo apt-get update \
    && sudo apt-get install x2goserver x2goserver-xsession
Start X2Go server
To set up and start the X2Go server, simply run:
sudo x2godbadmin --createdb \
    && sudo systemctl enable x2goserver.service \
    && sudo systemctl start x2goserver.service
Install your JetBrains IDE
You can install any JetBrains IDE however you like. The download links for any of the IDE's can be found at their products page.
In my case, I'm going to directly download the WebStorm using wget
mkdir -p ~/downloads && cd ~/downloads
wget https://download.jetbrains.com/webstorm/WebStorm-2023.1.3.tar.gz
sudo tar xzf WebStorm-*.tar.gz -C /opt/
After doing this, I can launch WebStorm by executing /opt/WebStorm-231.9161.29/bin/webstorm.sh
Set Up The X2Go Client
Install the client
To install the X2Go client, you can follow the instructions on the X2Go client installation page. For Ubuntu and Debian, you can install the X2Go client by running:
sudo apt-get install x2goclientCreate a new session
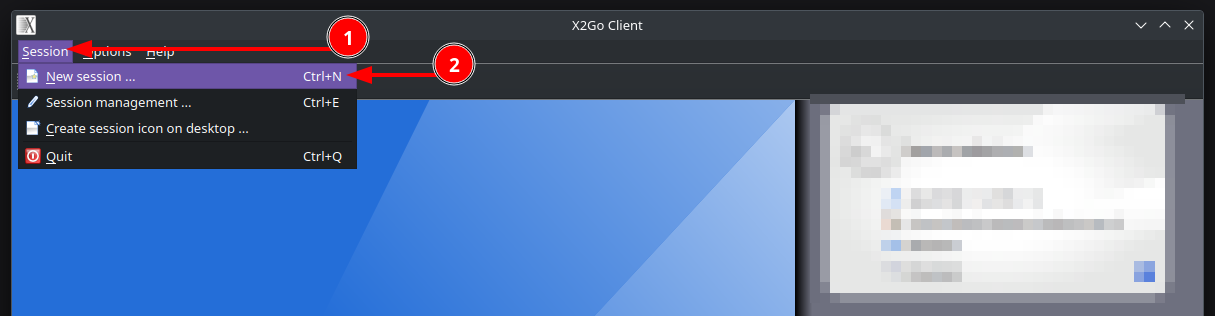
Run the X2Go client, click the session menu on the top left and select "New Session"
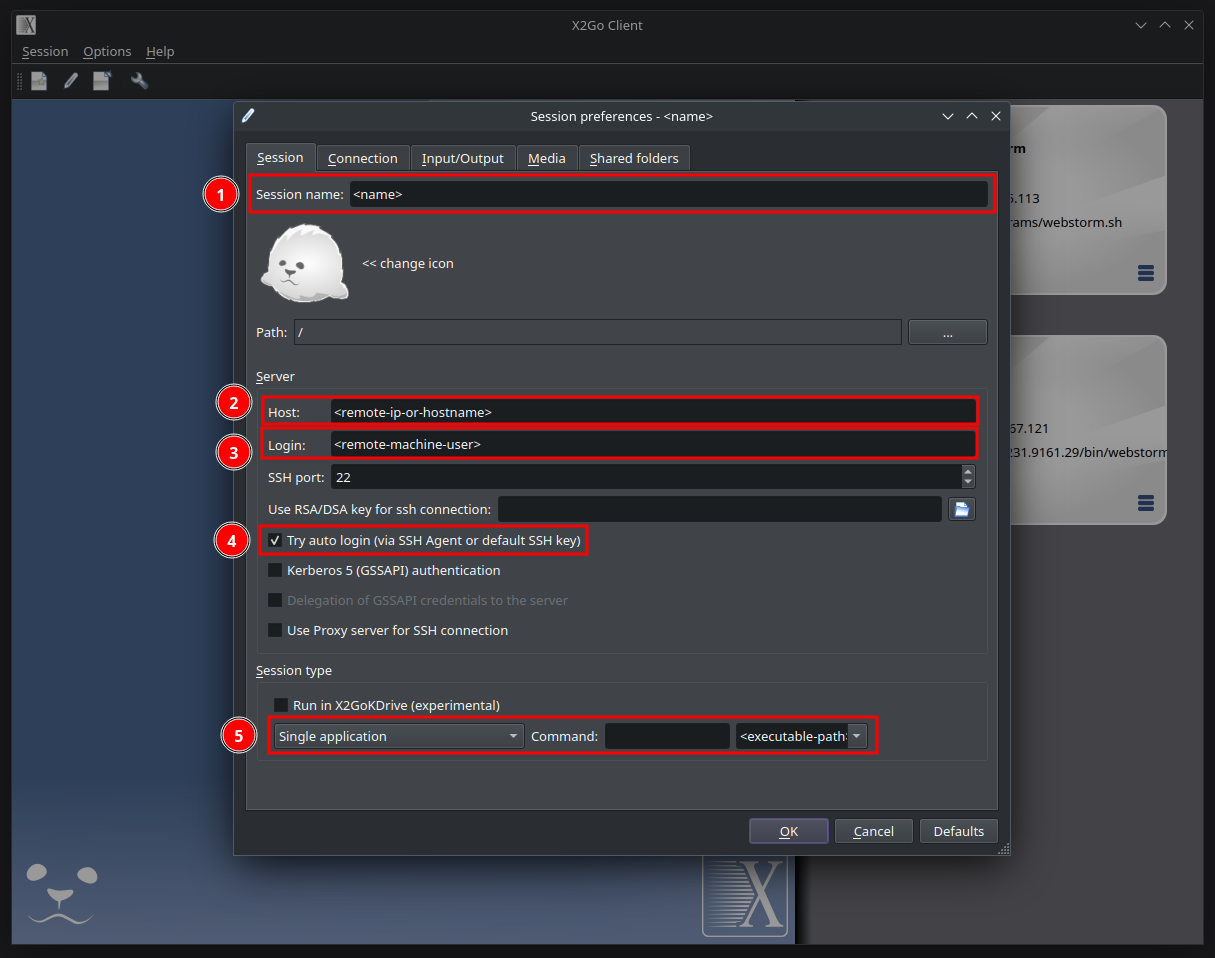
Configure your session as follows:
- Session name: This is just a name for your session, it can be anything
- Host: The IP address (or hostname) of your remote machine
- Login: The username you use to SSH into your remote machine
- Try auto login: Enable passwordless SSH access to your remote machine (optional, you can connect and use a password if you like)
- Session type: Select "Single Application" and enter the path to your executable, in this case your IDE. For example, if you followed the steps above for installing WebStorm, you would enter
/opt/WebStorm-231.9161.29/bin/webstorm.sh
Next click on the "Connection" tab at the top. Here you can configure settings for your session that primarily relate to the quality of the connection.
- Connection Speed: From my understanding, this setting determines whether X2Go will display certain window behaviours such as animations. I recommend selecting "WAN" or lower, unless your remote machine is in your local network. I keep mine set to ADSL but if you have a good connection to your remote machine, WAN works well.
- Compression: This setting determines how any image data sent from your remote machine is compressed. Most application GUI are actually rendered as images, as such this setting has a big impact on your performance. I recommend setting it to "adaptive", "16m-jpeg" or "16m-png-jpeg" and adjusting the image quality level accordingly.
Naturally, you will have to do some tests to determine what settings here work best for you

You may also want to visit the other tabs and make any configurations you like. For example, in the "Input/Output" tab, I like to set my resolution to "Custom" and use "800x600". Even though I have a 2K monitor, for whatever reason, those values seem to work perfectly.
Once you are done, click "Ok" to save your session.
Important Note For Windows Users
On Windows, bi-directional copy and paste between the remote and local machine doesn't seem to work by default. To fix that:
- Click the "Options" menu at the top of the X2Go client and then click "Settings"
- Click the "X. Org Server Settings" tab
- Enable/check the "do not use primary clipboard" setting
- Click "Ok" and restart the X2Go client
Launch your session
After creating your session, it will show up on the right hand side of the X2Go client. Simply click it to start your remote session with your configured application

What to expect
Once your launch your session, you should see your IDE open up on your local machine. You can now use your IDE as you normally would.
Just keep in mind, I've found that unless you have a really good connection to
the remote machine, any JetBrains IDE when it first launches will be painfully
slow. That includes accepting the terms and conditions, activating your
license, indexing your project etc...
However, once you get past that, you should find the IDE to be quite responsive. I've found that it runs almost as well as it would if it were running locally.
If you want to see what I mean, check out my YouTube video where you can see me starting up WebStorm for the first time.
Final Words
I hope this guide was helpful to you and I hope it saves you a ton of time and headaches.
At one of my businesses, we have 2 remote developers that are using this setup without issues. One of them lives at least 5000km away and seems to fare pretty well.
If you have any questions, issues or are confused about a particular step, leave a comment below or message me on Twitter.
Comments