Making sense of Git and GitHub
I remember when I first started my development journey. Git and GitHub confused the heck out of me.
I saw everyone using these tools regardless of what programming language they used or the context of their software. I knew they were important because of how widespread their usage was. However, I couldn’t really understand the importance of it.
Fast forward to today, the very first thing I do before starting any development project is initialize a Git repository. If you asked me to code a project without Git, I would say you’ve lost your mind.
Git and GitHub (or similar) are tools that every single developer on planet earth should be familiar with. You will never reach your maximum potential as a developer without being able to practically apply these tools.
The purpose of this article is to take you from feeling confused to having a practical understanding of how to use these tools. This will be the article I wish I read early in my development journey.
I believe the best way to learn something is to first understand its purpose and the surrounding context. Let's start with that before we get into how to use these tools.
What is Git & what is its purpose?
Git, according to the Wikipedia definition, "is a distributed version-control system for tracking changes in source code during software development".
Let me break down exactly what this means and why it’s important. First, let’s establish the obvious...
- Software is made up of code
- Code is typed into files on a computer
- Generally, all the code files for a particular software will be stored under a single folder
With that in mind, let’s look at some of the problems that Git can help us solve.
Tracking your development progress
As you are developing your software, you will need to
- Add new files to the folder
- Change existing files
- Remove some files
Over time, you slowly lose track of what you added, removed or changed. Software projects are typically maintained over many years. Unless you have superhuman memory, it’s impossible to not lose track of the changes you make over a long period.
Why does this matter?
Say you delete a block of code in a particular file and 1 month later realise you needed it. Sadly, it’s now gone forever so you need to re-write what was deleted.
Another example, your client says that everything was running faster 3-4 months ago and your latest updates have slowed things down. How do you remember exactly what you changed in the last 3-4 months?
Again, say you added in a new feature and now an old feature doesn’t work. You need to review the changes you made for the new feature. You need to find what you changed to cause the old one to stop working. Get ready to guess what you changed as your changes may encompass many files.
Isolating new developments
Not being able to carefully track all our changes leads to another issue. That is the need to isolate project updates.
What do I mean by isolating updates and why is this even necessary?
Let’s imagine a scenario, you have developed a website for your client. This is the code for your web server.
server.get("/", function (request, response) {
  var ip = request.ip;
  response.send("Hello, your ip is: " + ip);
});
It's pretty straight forward, when visited, it sends a message saying Hello, your ip is: ip_address.
You are now working on a new feature your client requested. He wants you to include the person's name in the greeting if supplied.
So now your code looks like this.
server.get("/", function (request, response) {
  var ip = request.ip;
  var name = request.query.name || "there";
  var message = "Hello " + name + ", your ip is: " + ip;
  response.send(message);
});
Suddenly your client calls. He says it's vital that you change the message from "Hello" to "Welcome". He wants you to do it right away.
Now you are in a dilemma.
You are not meant to release this new feature yet and furthermore you haven't even tested it. Yet, you still have to make the fix requested by the client ASAP. You only have 2 options...
- Delete the new code you wrote and make the fix
- Copy your new code to another file, delete your progress in the old file and then make the fix
Both options are not ideal. This may not seem like a big deal when your code base is small. However, imagine working on an update where you had to update 10+ files. You could easily forget to save some of your progress. You might even forget what changes you made and forget to revert them.
This is what I mean by isolating new developments. When making updates to our code base, we need a clone of our code to make changes too without affecting the main code base.
This way, if any issues arise with the main code base, we can switch back to it and fix them while leaving our updates code base unaffected.
Programming with others
You’ve got a new coding buddy and he wants to help you with your software. You copy your entire project folder into a thumb drive and pass that to him.
A month passes by, you keep developing awesome new features and he comes back with your drive. He too added in an amazing new feature.
You decide to add his new feature (his code) to your existing project. In the process of merging his files with yours, you realise the following:
- His feature depends on a few pieces of code you recently removed
- He also needed to change some of your existing code to make it work
- You also needed to change the same parts he changed to make your new features work
I dare you to try merge your project files with his so that both your new features work.
Since you both changed the same parts independently, you will need to carefully merge both the code bases together while keeping the functionality you both added in.
This is the process of resolving conflicts. Finding areas of conflict between both your code bases and then fixing those. Unless you do that, your software will no longer function correctly.
The problem is, how can you be certain all the conflicts were resolved if you have a large code base with changes occurring everywhere.
Further more, try to imagine how painful this might get if you were working on a large scale application with 100s if not 1000s of different developers.
It would become impossible for anyone to be productive. It would be impossible to run an open-source project with 1000's of collaborators.
How these problems are solved with Git
Tracking all your changes
Git is a version control system. Meaning it will track every single change made in a repository (repo for short).
A repository is essentially a folder that contains all your project files. You will need to tell Git which folder is going to be a repo. Every single file added or removed in that folder will be tracked. Every single line of code that has been modified inside will be tracked.
It provides you with a history system for every change made to your software project. Never again will code be lost. Never again will you guess what changes you made to cause something to stop working. Now you can see the details of every change made.
Just to clarify why we call it a version control system instead of a history system. Software is typically released in version numbers such as v1.0.0 or v3.5.2. Each version refers to a specific set of files and contents that make it up. The version control system will track exactly what is included in every single version and show you the differences between each version.
Isolating developments
Git has this concept of branches. A branch is an independent development timeline in your repository. What that means is, each branch contains a separate set of your project files.
When developing a new feature or fixing a bug, you can create a new branch of code that deviates from your main branch. In your new branch, any changes you make will be separate from the main branch. At any time, you can change between these branches with a simple command.
So before you make any updates to your code, you will want to create a new branch. Now, if the client calls and needs a quick fix, you simply change back to the main branch which would revert your code to before you started adding in the updates. Then the bug and re-deploy your application. After that, you can change back to the development branch and continue working on your updates.
Collaborating with others
Now, this is where it gets even better. When we have the history of a project, we can allow multiple people to collaborate with ease. Going back to the scenario of your friend helping add a new feature. Since you have a complete history of the changes you made and your friend made, software like Git can calculate the differences between each of your project copies.
With this calculation, it can tell you exactly what your friend has changed in your code base and whether you have changed the same parts.
This knowledge allows Git to show you exact points of conflict between both your code bases. Conflicts, as we described before, are sections of code that are no longer compatible with each other. With Git able to identify the points of
Merging multiple code bases is such a common use-case that Git provides a specific function called a merge. With this feature, you can take your friend's copy of changes and use Git to merge his files with yours while resolving all conflicts.
With Git, only once all the conflicts have been resolved, then the merge will be successful. This dramatically helps reduce any mistakes when combining code bases together.
Let me give you an example of a conflict. Say the original code you wrote was
function calculateWeight(size) {
  return size * 0.5;
}
After handing away the above code to your friend, you continued your development. You realise this function needed to be refined like this
function calculateWeight(size, density) {
  return size * density * 0.5;
}
When your friend returns with his code, he also modified the function like this
function calculateWeight(size, density) {
  return size * (density - 1) * 0.6;
}
Now, when you try a Git merge your code bases, it will see that both of you changed the same section of code in an incompatible way.
Git will consider this a conflict and alert you to this. You will need to either
- Choose your updated version
- Choose your friend’s updated version
- Manually combine or re-write the function
While Git has so much more to offer these are probably the main reasons it’s used. With the ability to track changes and merge code bases, we can solve the issues described above. Even if you are working alone, it’s still valuable for any project that you care about. Maintaining a log of exactly what we changed over time is so crucial to long-term developer productivity.
What is GitHub and what is it's purpose?
GitHub as the name implies is a hub for Git repositories. A repository (repo for short) as mentioned before, is effectively a tracked project folder. The purpose of GitHub is to act as a place to publish Git repositories.
You can really think of this as file hosting on steroids for code. What makes it special compared to normal file hosting is that it integrates with the functions of Git.
So why publish your Git repo online when you can use it on your PC?
I would say that there are 4 main reasons.
- Back up your code base
- Share code with others
- Collaborate on software projects
- Middle layer for your software development lifecycle
Backup & track your code base
The first point is obvious. GitHub is a great place to back up your code and track all the changes made to it. You should also take your own backups on devices you control for anything important.
GitHub also integrates with the Git tool to show you the entire history of your project. Using their simple interface, you can see all the changes made between each of your project versions.
Share code with others
Sharing code is also easy because it is an online service that uses Git. With the Git tool, one can easily clone your GitHub repository to their local PC.
With a cloned repository, you can easily sync any changes between the clone and the main one.
This makes sharing code and staying in sync a breeze.
Finally, GitHub introduces the concept of a forked repository. This creates a clone of a repo on GitHub which is now under your control. This is perfect if you want to create a spin-off for an existing project.
Middle layer for your software deployment lifecycle
Since GitHub is such a commonplace for people to store their code, it also ends up being integrated with a good deal of software development tools.
For example, Netlify, a fantastic place to host static sites (like this one), can pull all your code directly from GitHub and then host it. We can also configure it to automatically pull and host the latest code any time you update your repo.
Collaboration platform for software projects
GitHub includes a variety of helpful tools for code collaboration. For example, every repo has its own issues section. Users can create a ticket for each issue they find which can then be closed once the issue is fixed.
This is commonly how open-source projects manage their community feedback.
The other feature GitHub provides is the ability to create a pull request. A pull request is a request to merge two related code bases together. This uses the Git merge functionality under the hood to ensure that code bases we merge code bases without conflicts.
This is what it looks like.
As shown above, GitHub will show you exactly what files and lines we modified in the new code base. The admin of the original repo will then review the modifications. If everything is good, they can choose to complete the merge between both code base.
This workflow will probably be common in your job environment were you must work with a team of others. Generally, a project manager will review all your pull requests for new features or fixes before merging it into the main code base.
So hopefully your confusion has been cleared with regards to the purpose of Git and GitHub. I hope you can see the beauty of these tools and how they can impact your developer experience.
The rest of this article will look at exactly how to specifically solve the problems outlined above while introducing you to the concepts and commands in Git.
Getting started with Git and GitHub
This part assumes that you have basic knowledge of using the shell/terminal. Git is predominantly used in the terminal. There are graphical interfaces for Git but I think starting with the terminal is simpler.
In Windows, when installing Git, you can choose to install the Git bash terminal. I recommend using this terminal on Windows one as it stays consistent with the Mac and Linux terminals. On Mac and Linux, you can use your standard terminal that should already be installed.
If you are completely unfamiliar with using the terminal, consider watching this video
In this tutorial, we will do the following:
- Install Git onto your PC
- Create a Git repository
- Create a commit (save point)
- Push our repository to GitHub
- Create a clone of your repository
- Updating your code
- Create and accept a pull request for the updates
- Sync those updates back to your original repo
Install Git onto your PC
You can find the official instructions for installing Git here.
Follow the instructions for your operating system. If something in the installer confuses you, just use the default settings and proceed.
To confirm Git is installed, open your terminal and type the following
git --version
# git version 2.17.1
If the Git version is printed out, you have successfully installed Git.
Create a Git repository
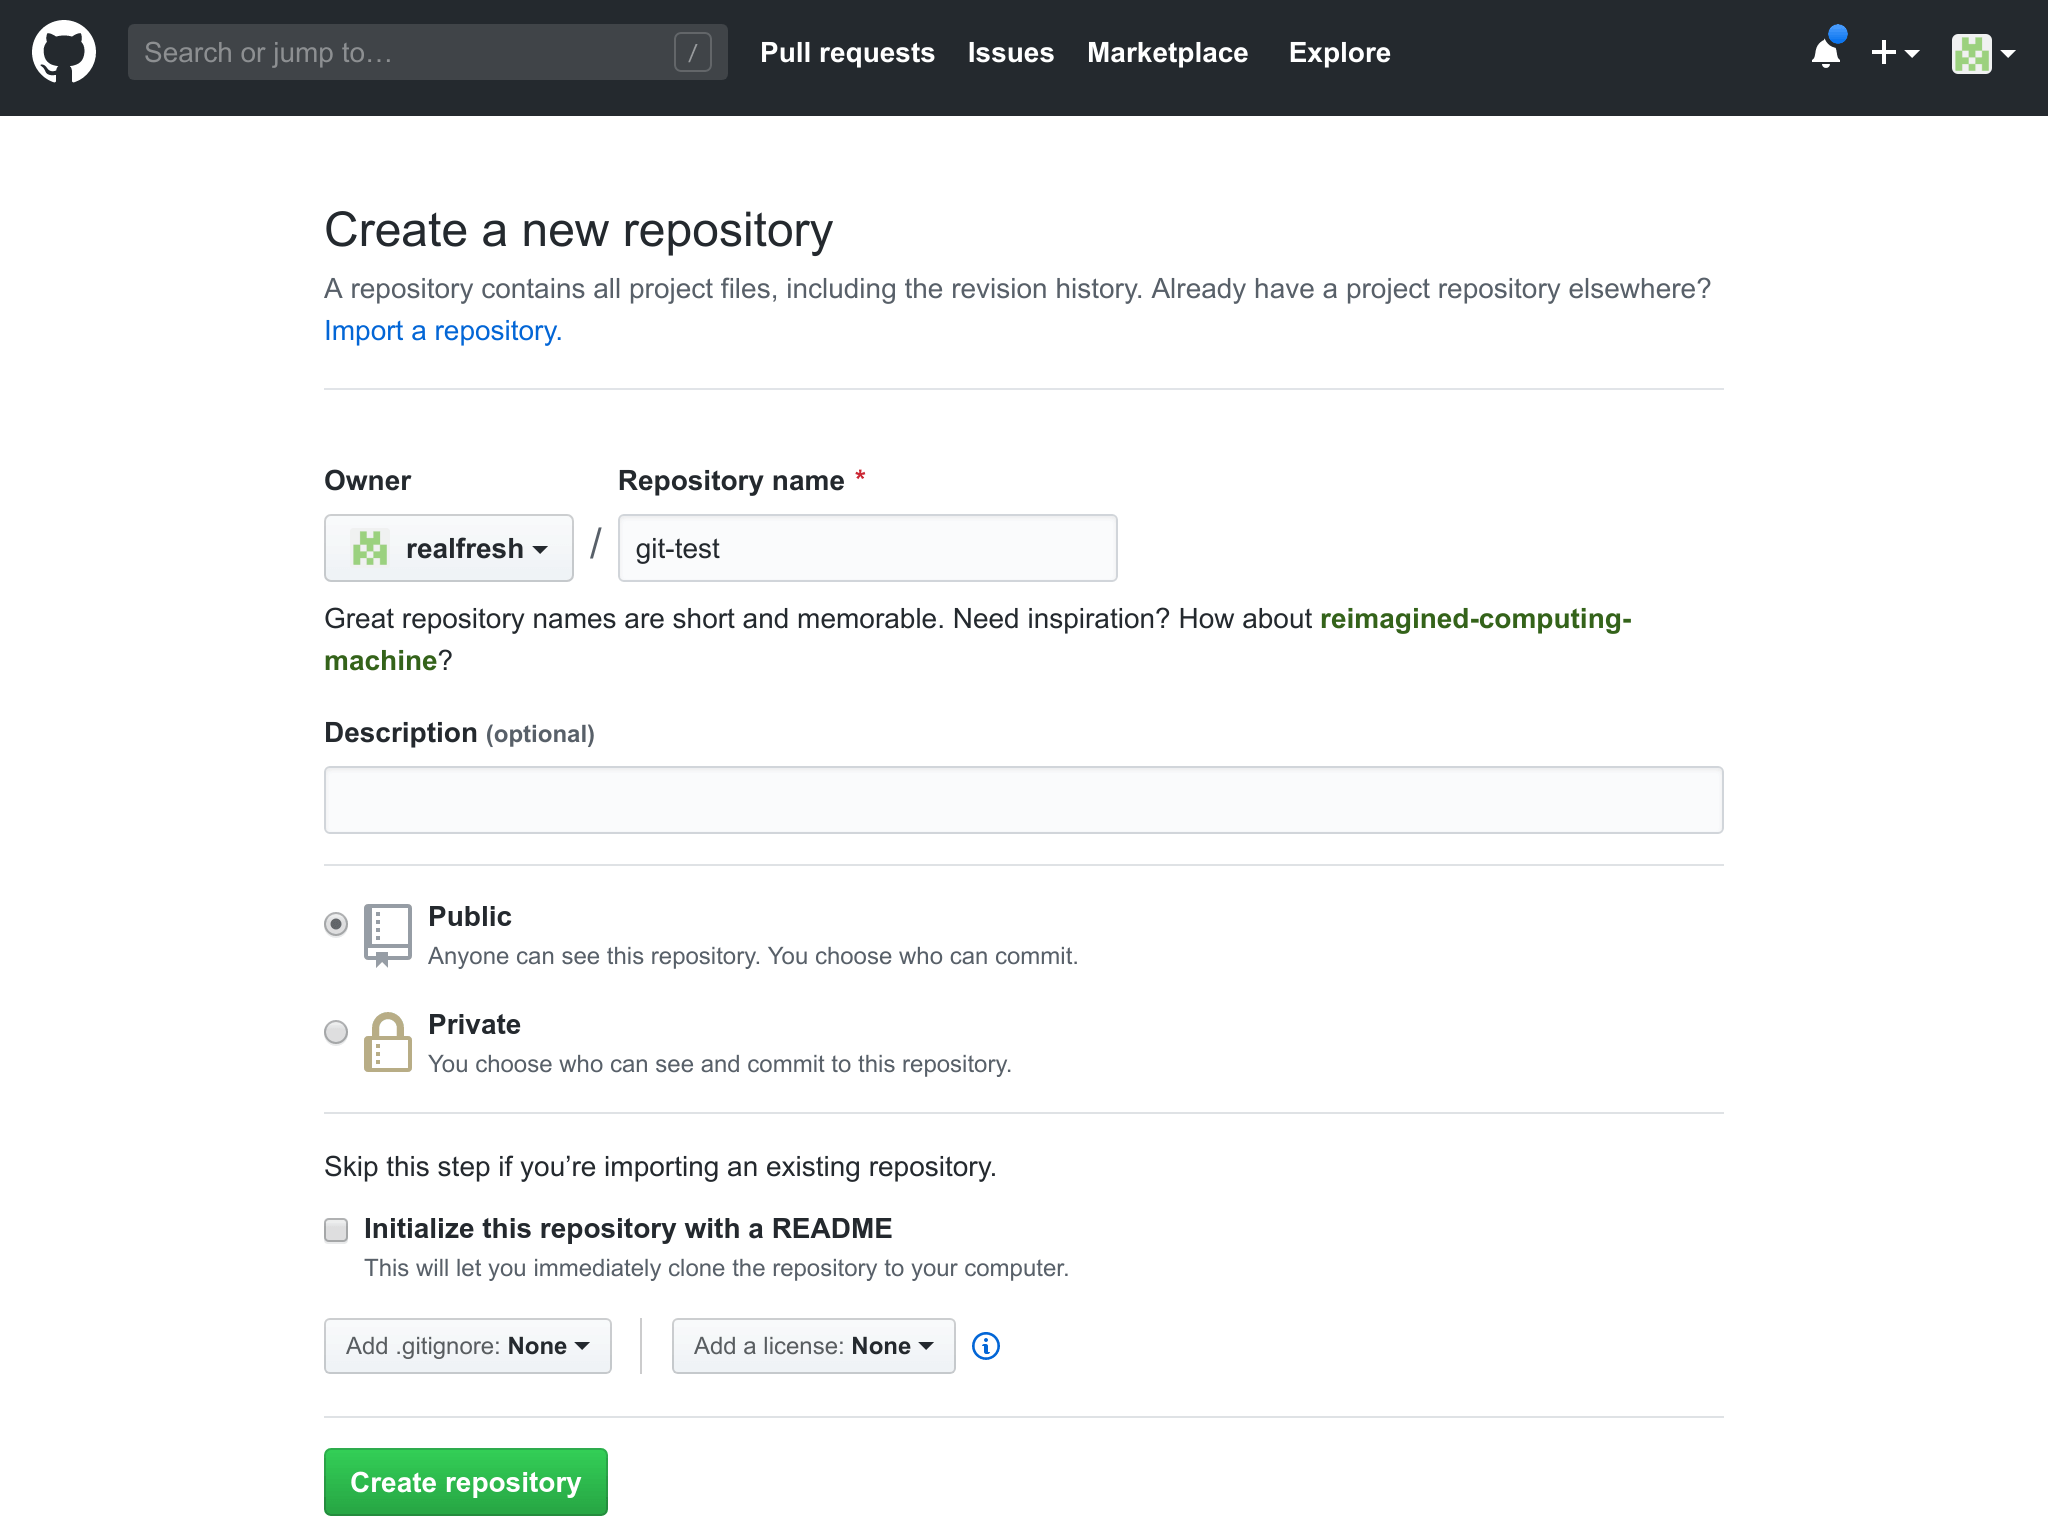
To create a Git repository, you must first create a new folder and navigate to it in your terminal. Let's call it git-test. We can do with the following commands
mkdir git-test
cd git-test
Once we are inside the new folder, it's time to tell Git that this is new repository. To do this, we run the following command
git init
# Initialized empty Git repository in /home/user/git-test
Once done, you have officially created a local Git repo (local as in on your PC). Everything you add, remove or modify within this folder can be tracked.
Create a commit (save point)
Before we create a save point in our code base, we first need some files to save. Lets add a file inside our git-test folder called index.html.
Open this file with a text editor or IDE and paste the HTML template below inside. For those not familiar, HTML is the language used to create web pages.
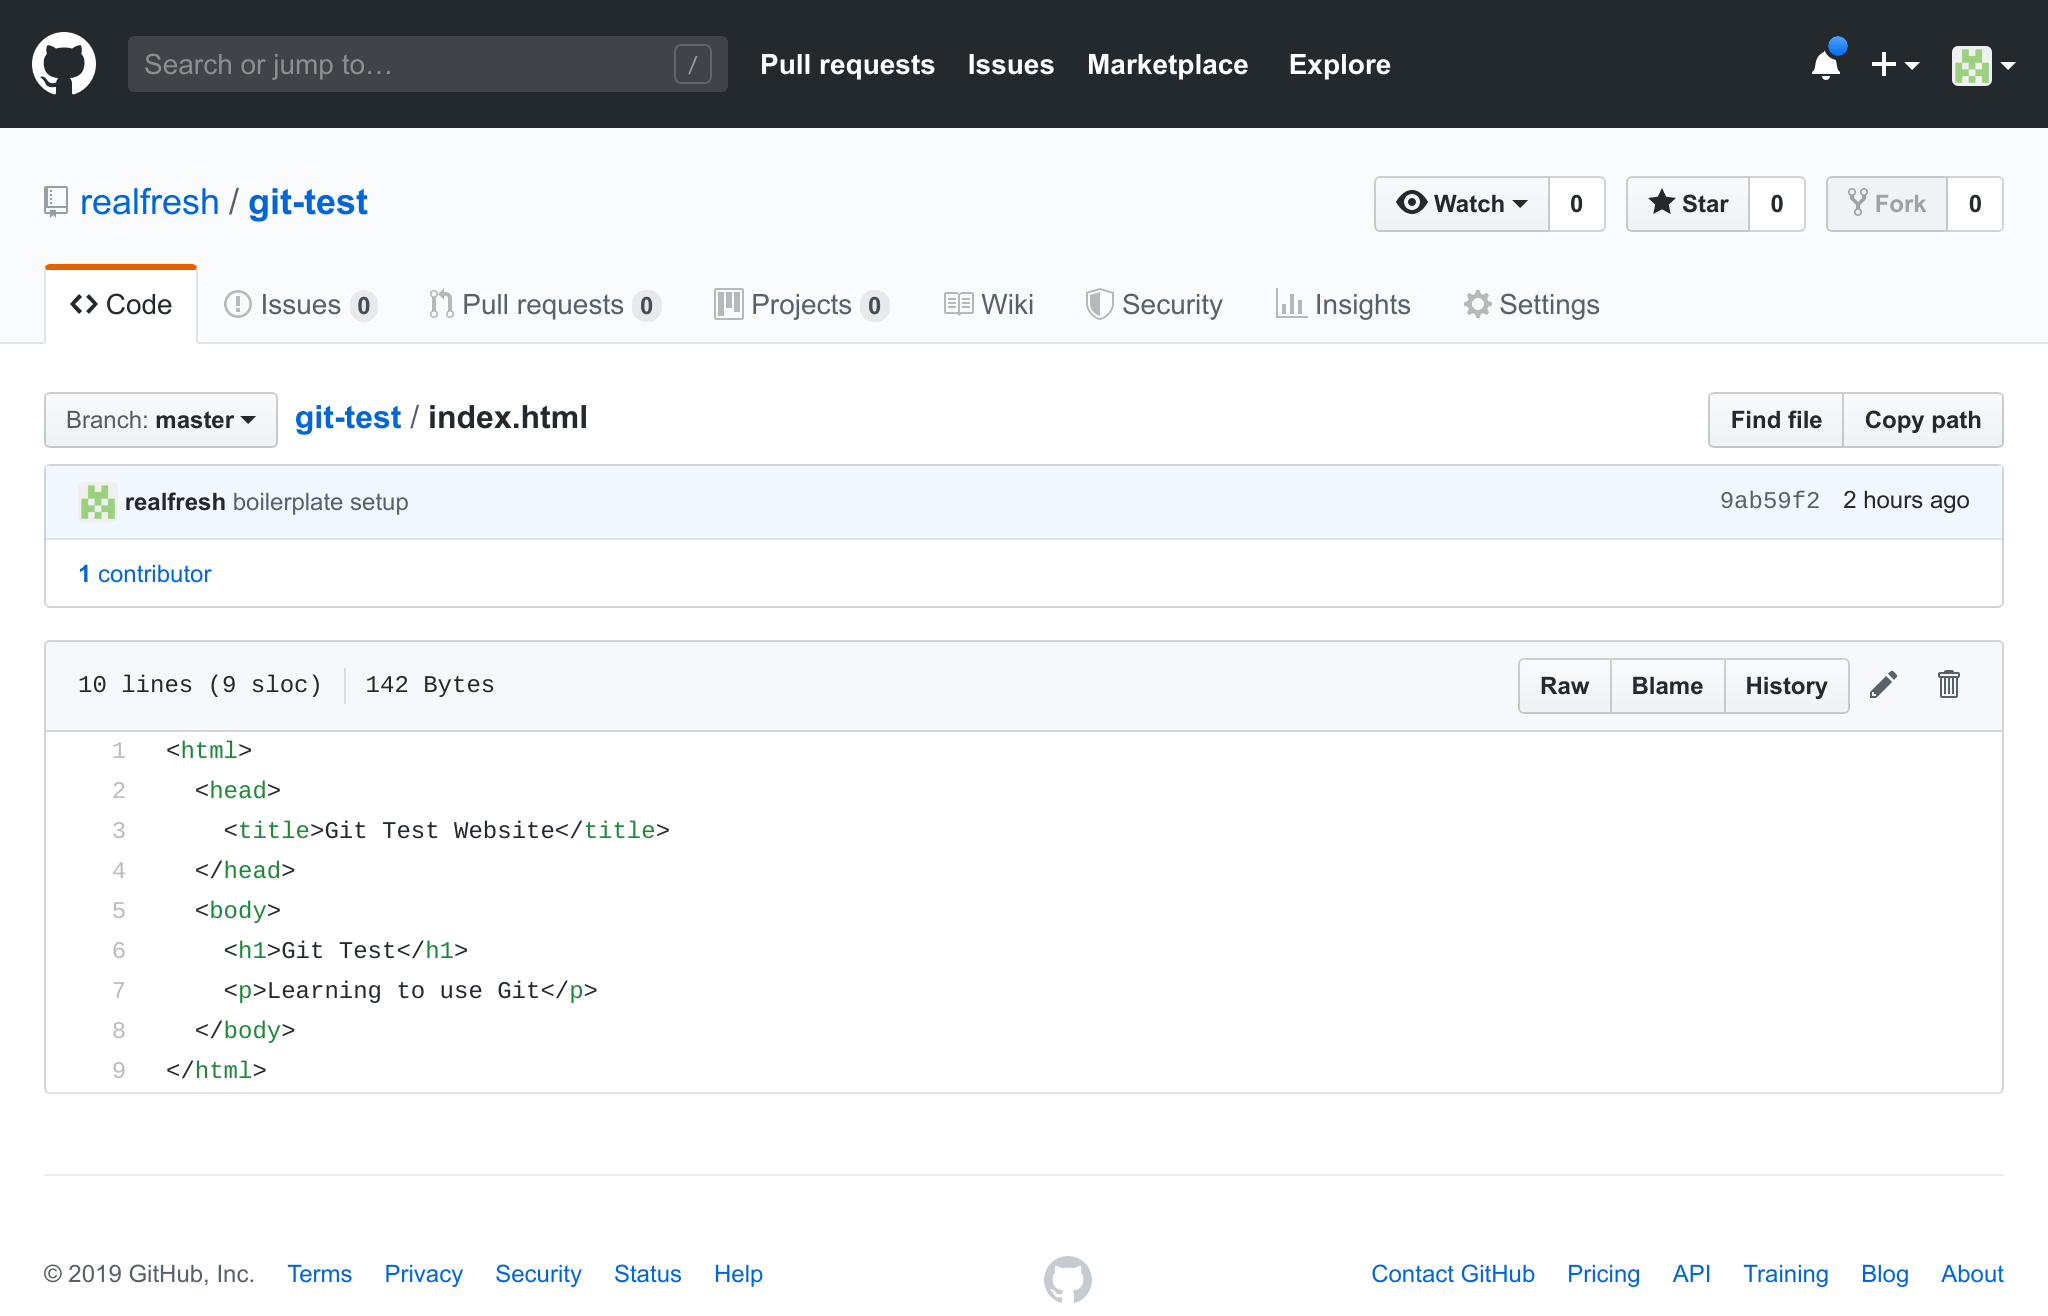
<html>
  <head>
    <title>Git Test Website</title>
  </head>
  <body>
    <h1>Git Test</h1>
    <p>Learning to use Git</p>
  </body>
</html>
If you were to open this file with your web browser, you would see something similar

Now this is where the fun beings. We are going to learn about something called a commit. A commit is essentially a snapshot of all the files in your repo.
It marks a specific point in your development progress that you would like to save. Git is able to show you the differences from one commit to another.
Before we create a commit, let us review our changes we made since the last commit, which in this case is when the repo was first initialized.
To do this, type the following into your terminal
git statusThat will print the following
On branch master

No commits yet

Untracked files:
  (use "git add <file>..." to include in what will be committed)

        index.html

nothing added to commit but untracked files present (use "git add" to track)
The message above is telling us we have one new untracked file index.html.
Git won’t automatically start tracking changes you make within your repo. You are responsible for telling it what changes to track. Officially, this is called staging your changes.
Before we tell Git to start tracking our changes, it’s always important to first review what we modified. Reviewing your changes is an important part of your development cycle. You would be surprised how many mistakes you will catch over the years just because you took the time to review your changes.
Occasionally, you may be in a rush and may not have the time to do a quick review, but you still want to save your work. In these instances, it’s better to just track changes anyways and later review them.
Now that we have reviewed our modifications, it’s time to tell Git to track the changes we have made. We will use the git add command to do this. To track all changes within your repo, we would run the following command in the base / root folder of our repository
git add .The . at the end of git add refers to the current folder. This is telling Git to add / track all the changes made in the current folder.
After running that command, let us run git status again. This time, the output will show
On branch master

No commits yet

Changes to be committed:
  (use "git rm --cached <file>..." to unstage)

        new file:   index.html
As you may have noticed, the status command is now telling us it's ready to commit your new index.html file.
It's time to create a snapshot of your files by committing your changes to the official development timeline of your project. To do this, we will use the git commit command in our folder like this
git commit -m "boilerplate setup"Notice the -m “boilerplate setup” option. This is telling Git to create a commit with the description “boilerplate setup”.
Every commit must include a descriptive message that summarizes the changes made. This is important, especially when working in teams. If we created a save point with no reference message, everyone would be lost as to what was even being done at that point.
After running the command, the output will be
[master (root-commit) 9ab59f2] boilerplate setup
 1 file changed, 9 insertions(+)
 create mode 100644 index.html
This is confirmation that we have created a commit. It tells us 1 file was change occurred and 9 new lines of code were added. It also shows that a new file was created called “index.html”.
With Git, we can easily see all the commits made to a repo. If run git log in our terminal, we would see the following output.
commit 9ab59f2815fcfb1d7a26b567b30650bfcaaf06e4 (HEAD -> master)
Author: user <user@example.com>
Date:   Wed Jul 24 11:41:07 2019 +0800

    boilerplate setup
The log is showing us the commit we just created along with useful information like the message and date. The scrambled text in the log is known as the commit hash. This is used to uniquely identify the commit.
We can use the commit hash to revert our current code files to the file snapshot of a particular commit. This is how we can view the history of our project. While you can use the Git command line tool to do this, I would highly recommend using the GitHub interface which we will get to soon.
Push our repository to GitHub
So far we have seen how to use Git on our PC. We saw how to create a repo, add changes to it and commit those changes.
Now let’s see how we can use GitHub to back up our code, track changes to our code base and collaborate with others.
The first thing we want to do is head to https://github.com. Create an account here if you don’t already have one.
After creating a GitHub account, we also wanted to provide our account credentials to our local Git program. To do that, we can use these commands.
git config --global user.name "username"
git config --global user.email test@example.com
git config credential.helper store
If you are using a shared PC, do not run the last command as it’s responsible for saving your password to avoid re-entering it every time.
After running those commands, you will be good to go. When you first connect to your GitHub repo, you will be promoted for your account password. After entering it the first time, it will now be saved permanently thanks to git config credential.helper store command.
Next, go to GitHub, on the top right corner, press the + symbol and select “New repository”

On the next page, you will need to provide a name for you repo. You can add a description if you like and set it to a public or private repo. A public repo is accessible by the world. Private means you must explicitly share it with others. You can use public for this tutorial.
Once you complete the form, press the green "Create Repository" button.
You will then be taken to your repo setup page.
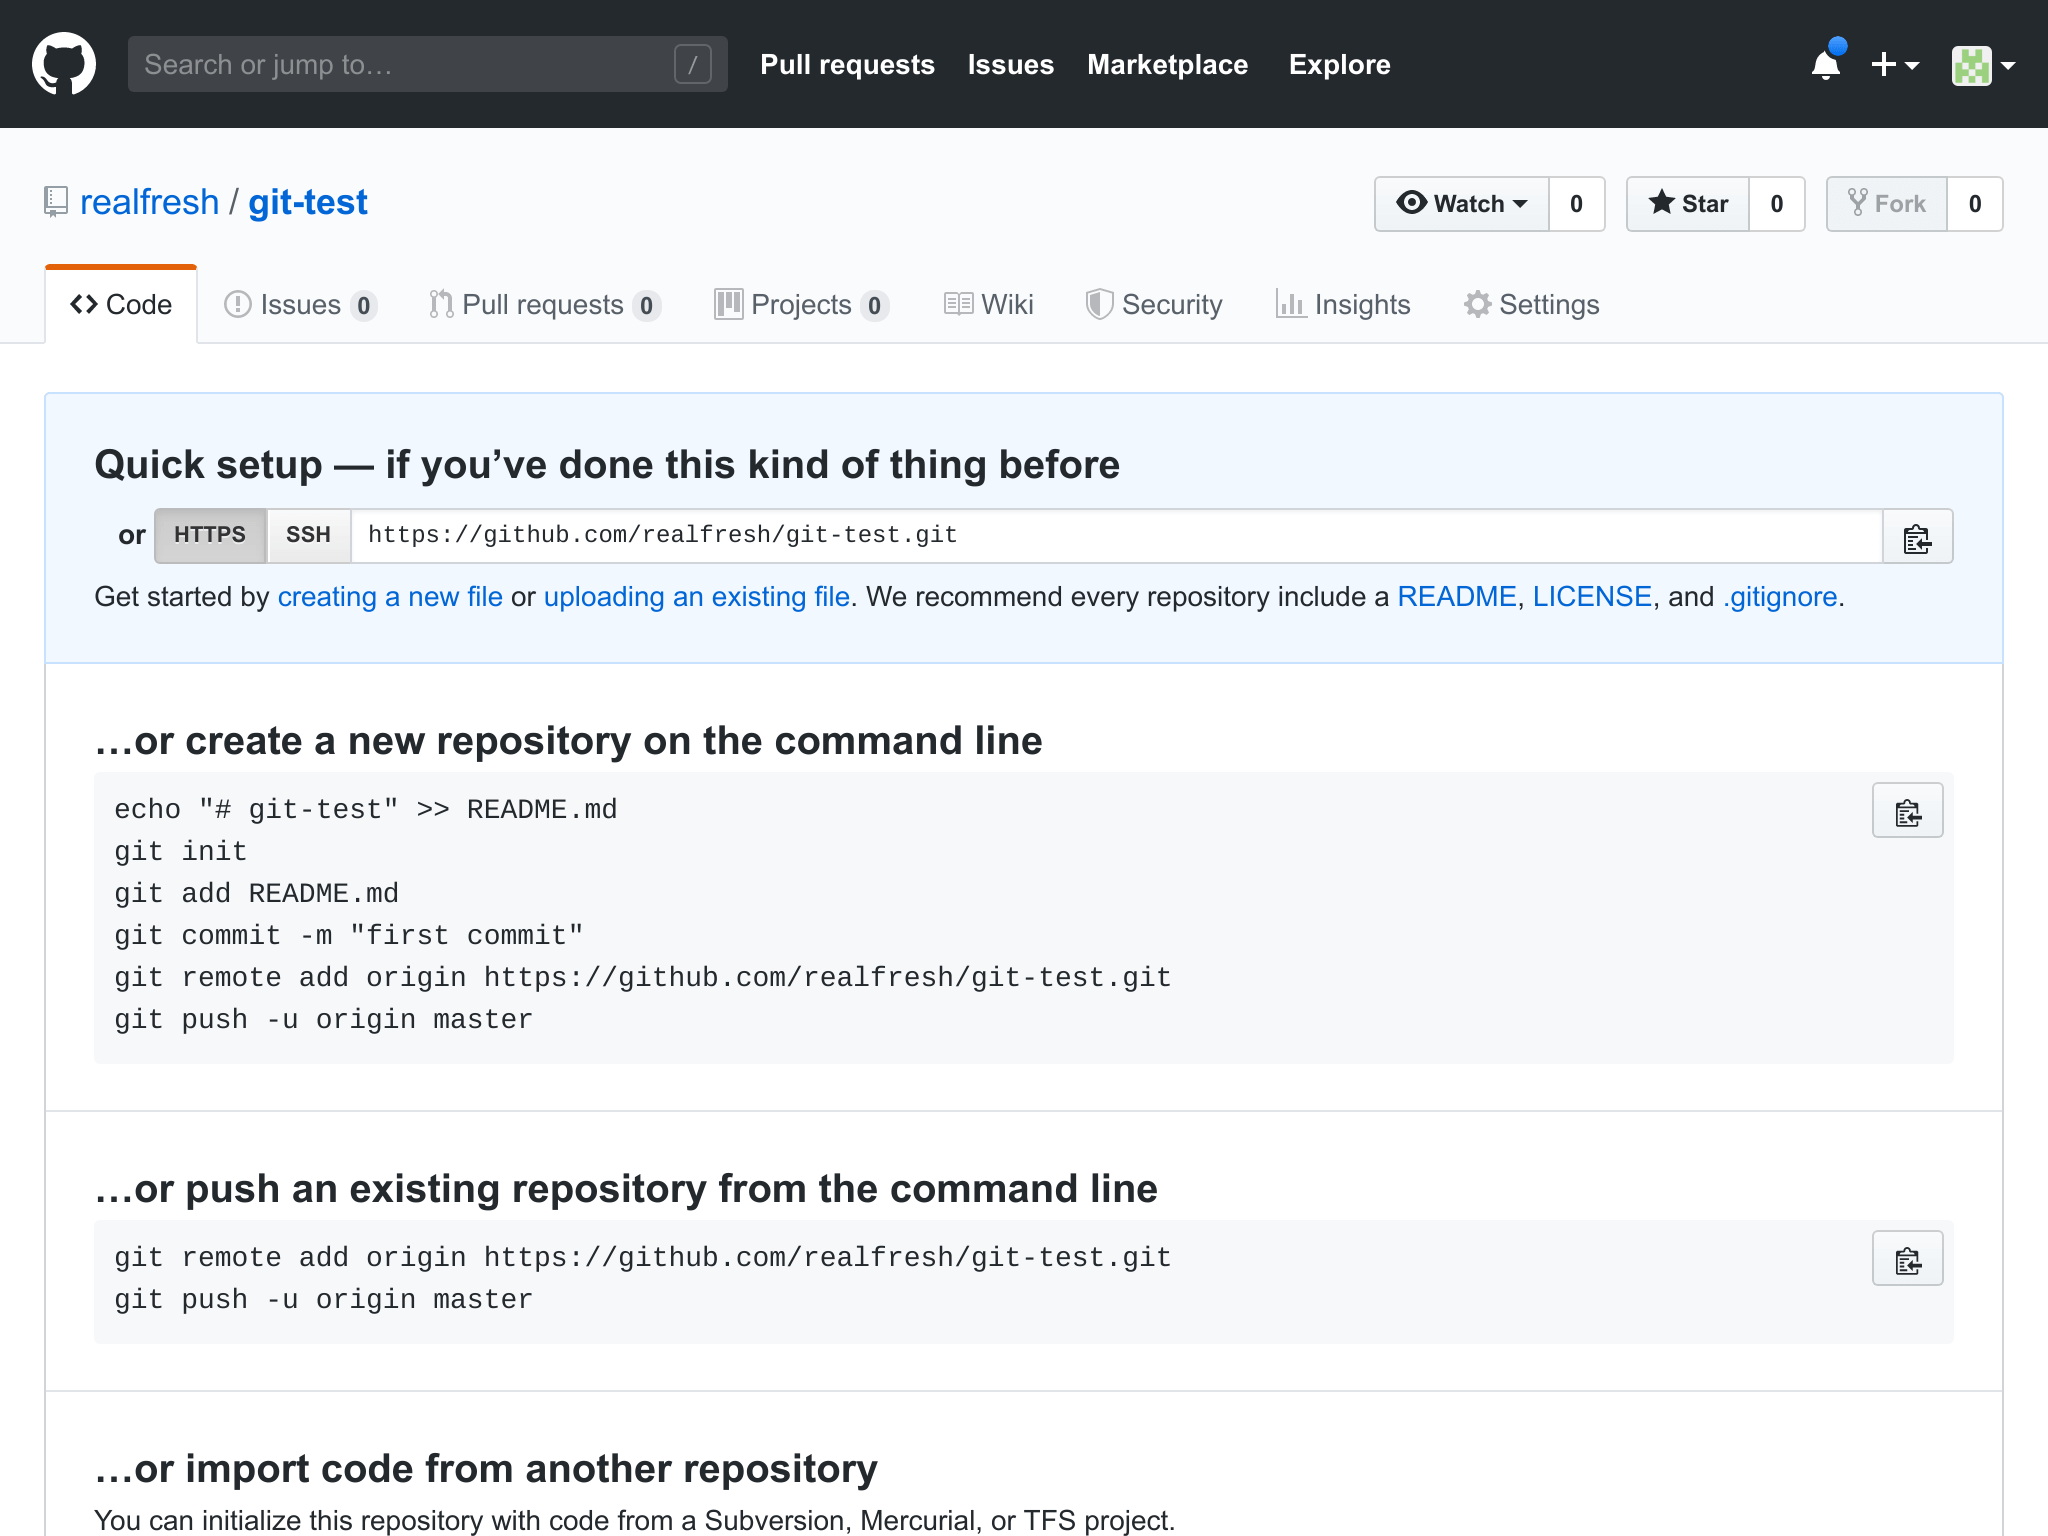
There are several ways for you to setup your new GitHub repository. Since we already have an existing repo on our PC, we will use the second option "…or push an existing repository from the command line"
It's telling us in to run the following commands in our terminal
git remote add origin https://github.com/username/git-test.git
git push -u origin master
The first command tells Git that the repository on our PC should be linked to your new GitHub one. This is called a remote. A remote is simply a common repository used by many to sync changes between. The command also gives the remote a name of "origin".
Typically, the origin remote is the master repo for all the source code of an application. All members of your team will generally sync their local development code bases with the origin remote.
The second command git push -u origin master is used to upload our changes to the origin remote into the master branch.
Let's break down what this means. git push is telling Git to push all the changes made on your local repo (i.e. each new commit) to the origin GitHub remote we just linked our local repo to.
The last word master is telling Git to push the changes to the master branch. Remember how we previously talked about isolating our new developments inside a separate branch?
This is where branches start coming into play. Every Git repository comes with a default branch called master. This branch usually represents the live segment of our code that clients are using. So for a website, the master branch contains the code that is running on our live web server going out to end users.
New features and changes should never be worked on the master branch. Software is delicate, we want to make sure we don’t cause any issues with our updates. The master branch is usually reserved for carefully reviewed code that is ready to be published.
Since we have just initialized our GitHub repo, let's publish our initial code to the master branch before we start on new branches of development.
One last point to touch on is the -u option part of the push command. This option tells Git that the repo we are pushing changes to is essentially our main repo that changes must be synced with.
We only need to use the -u option when we first push changes to the GitHub repo. Later on, we can leave it out when pushing new changes.
After running the commands, we will see the following output
Counting objects: 3, done.
Delta compression using up to 8 threads.
Compressing objects: 100% (2/2), done.
Writing objects: 100% (3/3), 308 bytes | 308.00 KiB/s, done.
Total 3 (delta 0), reused 0 (delta 0)
To https://github.com/username/git-test.git
 * [new branch]      master -> master
Branch 'master' set up to track remote branch 'master' from 'origin'.
This output tells us the files were successfully pushed from your local repo master branch to the GitHub repo master branch.
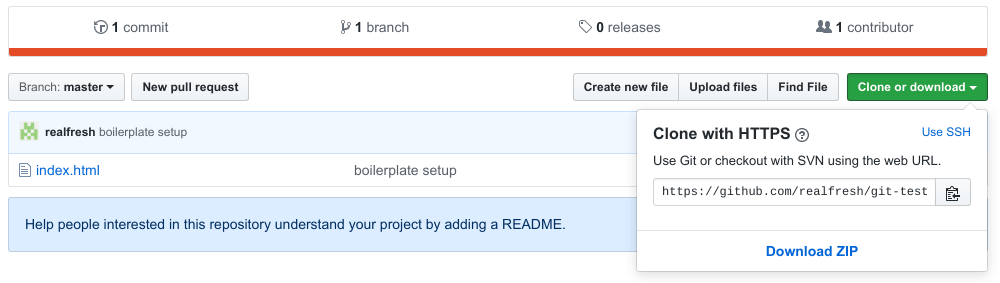
If we go back to our GitHub repo in the web browser, refers the page and you will see this
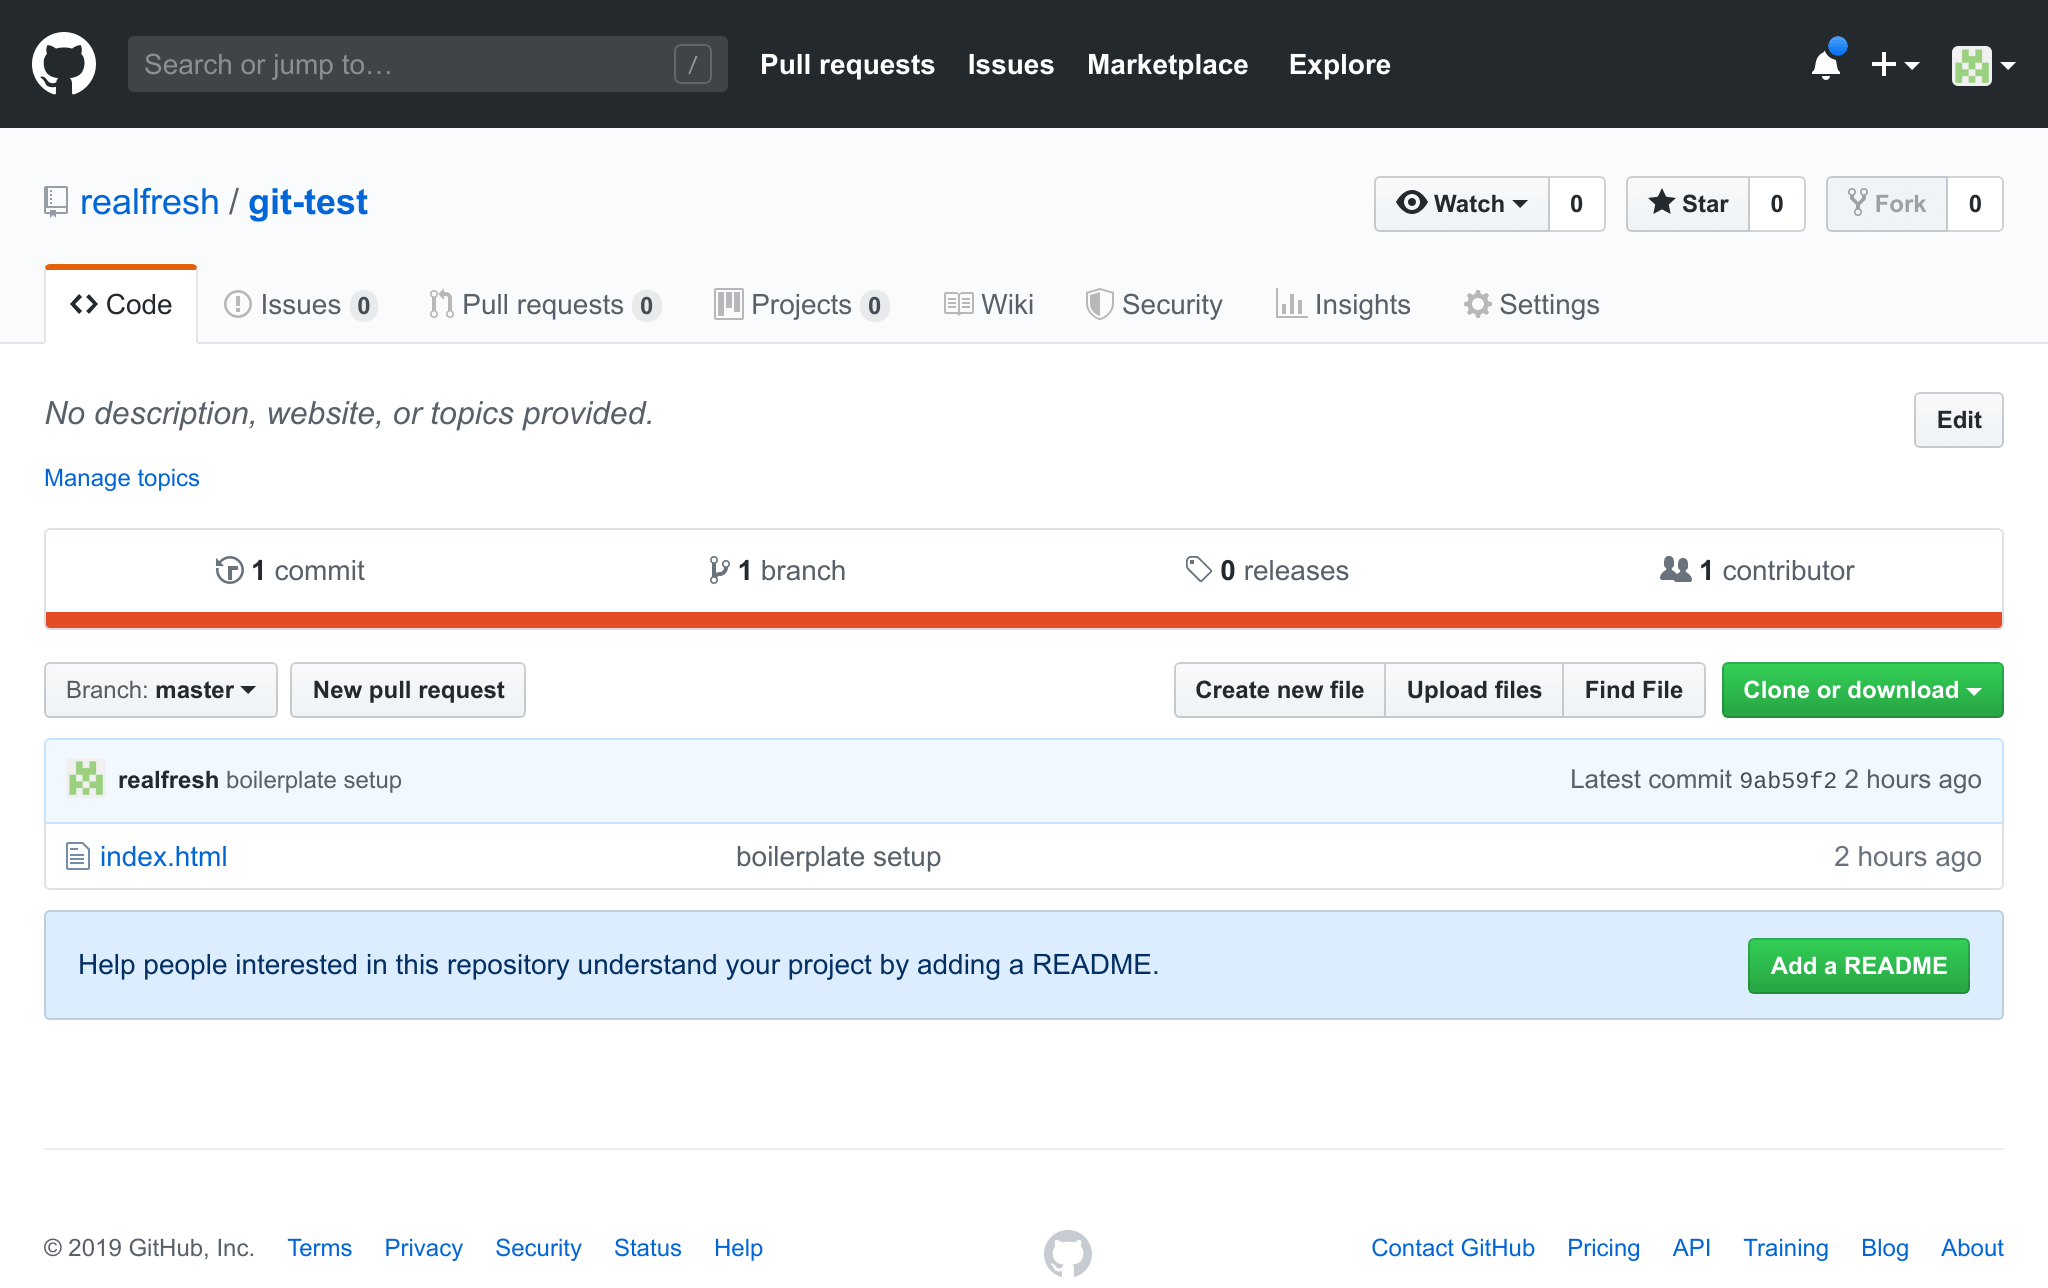
Notice your index.html file is now inside your repo. You can also see the commit message you included when the file was last modified.
If we click on the index.html file, we will see the code inside it
So now, you have seen how to create a repository, commit (save) changes made inside, and then upload them to your GitHub repository.
You can continue making changes as needed. All you need to do to sync your changes with the GitHub repo is
git add .
git commit -m "description"
git push origin master
Whenever you finish working on something new or make good progress, it’s best to create a commit and push it.
Now that your files are on GitHub, it's easy to view all the changes in your code base between each commit. To do this click on the text saying "1 commit"

We will then be taken to a page showing us a list of our commits. If we click on our "boilerplate setup" commit, it will revel the changes made in that specific commit.
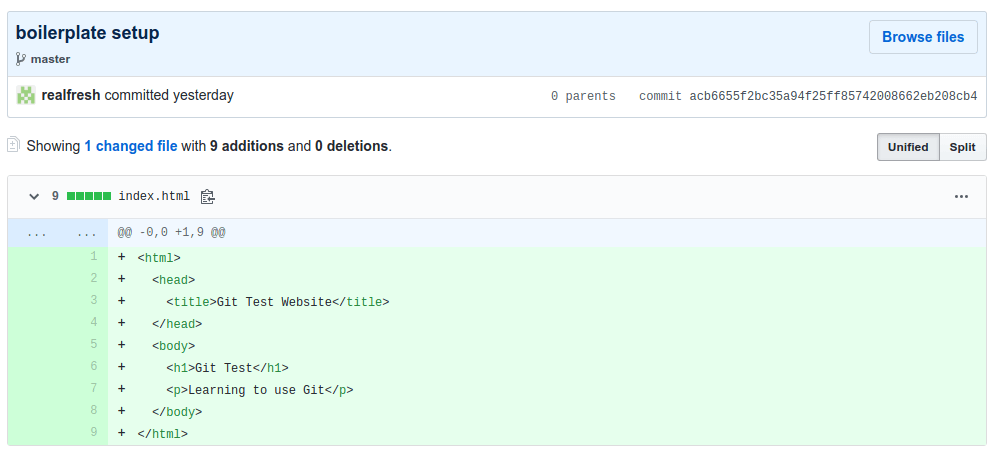
The green lines indicate new lines of code added. You can also view the contents of all the files in that particular commit by pressing the "Browse files" button on the right side.
This is probably the easiest way to keep track of your project history and view the exact changes made between each commit.
Create a clone of our repository
Now that you know how to use GitHub solo, it's time to learn how to collaborate with others and build new features.
Let's go back to the friend example and pretend to be your friend. He wants to contribute something to your awesome web page. The first thing he needs to do is get a copy of your code.
You give him the link to your GitHub repo and tell him to clone it. To clone the repo we need the GitHub repo URL. You can get this by pressing the green "Clone or download" button on the GitHub repo page.
Copy the URL inside the popup. We now need to exit the git-test folder in our terminal and clone the GitHub repo. To do this, we run the following commands making sure to replace the GitHub url with the one you just copied
cd ..
git clone https://github.com/username/git-test.git git-test-clone
The last argument for the git clone command is the folder to clone the repo into. Git will create this folder for you, in this case git-test-clone.
Next, navigate into the new folder with the following command
cd ./git-test-cloneInside this new folder, you will find your index.html file you originally created in your initial git-test folder.
If you run git log, you will see the same output as before with your commit from the initial repo.
Updating your code
After getting a clone, your friend is ready to make changes. The first thing he needs to do is create a new branch for these changes. This is something you should be doing whenever you are making updates to your code so that changes are isolated.
If you are working by yourself, you would be doing this in your initial repo. For the purpose of this exercise, let's continue pretending to be your friend and work in our cloned repo.
To list our existing branches, we can type in
git branchThat will currently output
* masterRight now we only have a master branch. To create a new branch, we use
git branch new-featureThis will create a new branch called new-feature. Lets run git branch again. This time we see
* master
  new-feature
We have our new-feature branch but the current branch as indicated by the * is master. To switch to our new branch, we will use the git checkout command as follows
git checkout new-feature
# Switched to branch 'new-feature'
We are now completely isolated away from our master branch. Any changes made here will not affect our master. As previously stated, this is ideal as our master branch typically is our live application code that we should treat with care.
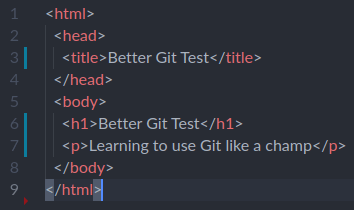
Let's now modify our index.html to the following
<html>
  <head>
    <title>Better Git Test</title>
  </head>
  <body>
    <h1>Better Git Test</h1>
    <p>Learning to use Git like a champ</p>
  </body>
</html>
If you are using an IDE such as Visual Studio Code, most have Git integrated into the editor. It will show you precisely what lines were modified since the last commit.
The blue lines beside the line numbers show that the code was modified at that line. A red line shows that lines have been deleted in that area.
Clicking on a blue line will reveal the following
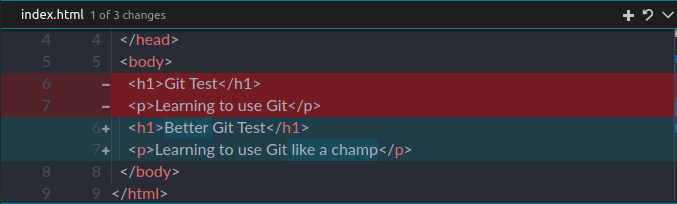
It's showing us the exact modifications that took place since the last commit. This is useful when reviewing changes made before committing them.
Once we are happy with our changes, let commit them to the new branch by running the following in our terminal.
git add .
git commit -m "better wording"
The output will say
[new-feature b066b1a] better wording
 1 file changed, 3 insertions(+), 3 deletions(-)
It's letting us know that we modified 3 lines in a single file. If we run git log now, we will see both our commits
commit b066b1a5d5396f87c70e2fcfe4cac17aef001ba8 (HEAD -> new-feature)
Author: user
Date:   Wed Jul 24 14:44:13 2019 +0800

    better wording

commit 9ab59f2815fcfb1d7a26b567b30650bfcaaf06e4 (origin/master, origin/HEAD, master)
Author: user
Date:   Wed Jul 24 11:41:07 2019 +0800

    boilerplate setup
While we are here, let's go back to the issue of a client needing an urgent fix. Since we are working on a separate branch, we can quickly swap back to the master branch to make the fix. We can do this by using git checkout and running the following command
git checkout masterIf you run that command in your terminal, you will see that your index.html file has reverted back to before you made the updates.
If you run git log, you will see that your "better wording" commit is no longer present as it's not part of the master branch.
Let's head back to our new-feature branch by typing in
git checkout new-featureNow let push our new-feature branch to our origin GitHub repo. To do this, we type in
git push origin new-featureHead back to the GitHub repo in the web browser, refresh the page and we will now see this.
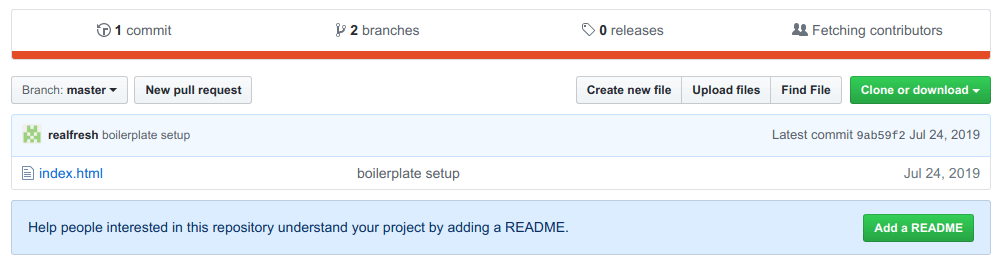
Notice how at the top, it now says "2 branches". If we click it, we will see a list of branches available. We can also explore the code in each branch by clicking the name or using the branch selector above the file list.
Create and accept a pull request for the updates
At this point, we are still pretending to be your friend who is suggesting some changes.
Your friend wants to officially put forth the changes he made and whats you to merge his new code with your master branch. To do this, he will create a pull request. A pull request is a request to merge two code bases together.
In this case, your friend wants you to merge his new-feature branch with your existing master branch code. To do this he will navigate to the pull request page on your GitHub repo by clicking "Pull requests" in the top bar of the GitHub page.

On the next page, we can see all the current pull requests for the repo. To start a new one, press the green "New pull request" button.

Initially, it will tell you there is nothing to compare. You will need to use the branch selector to select the new-feature branch. The selector looks like this
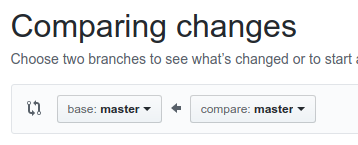
The arrow is pointing in the direction of which branch will be merged into which. In this case, we want to merge changes from our new-feature branch to master. To do this, we would click on the second box and select the new-feature branch. Leave the first box as master.
After doing that, we will see the page change to show us a comparison of our new-feature branch to the master branch.
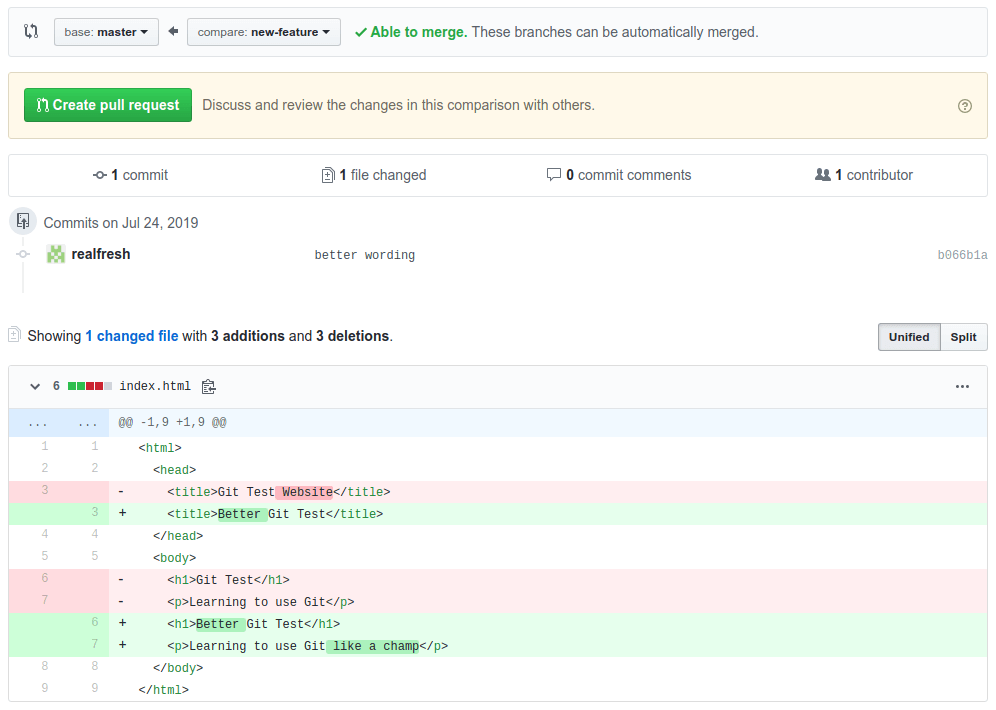
If we are happy with our changes, we can press "Create pull request" to start the process.
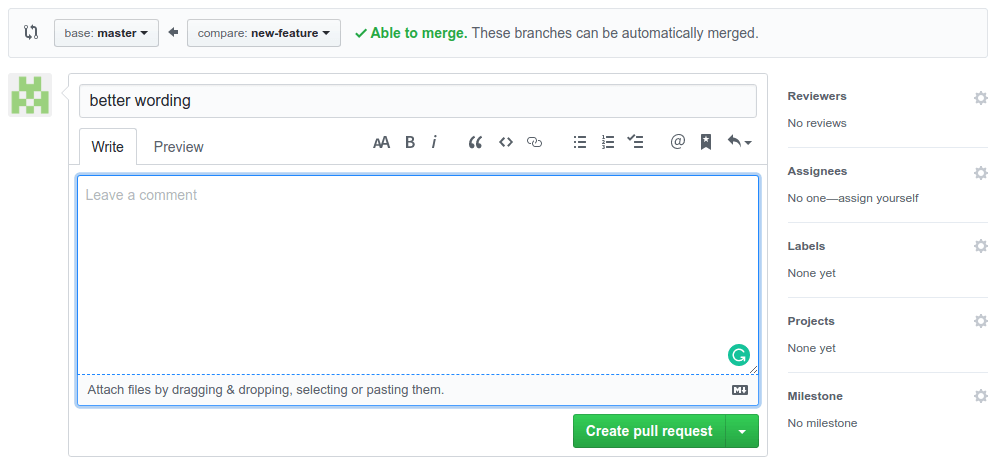
You will need to provide a title and description for the pull request to give more context about what it concerns. Once that is done, press the green "Create pull request" button again.
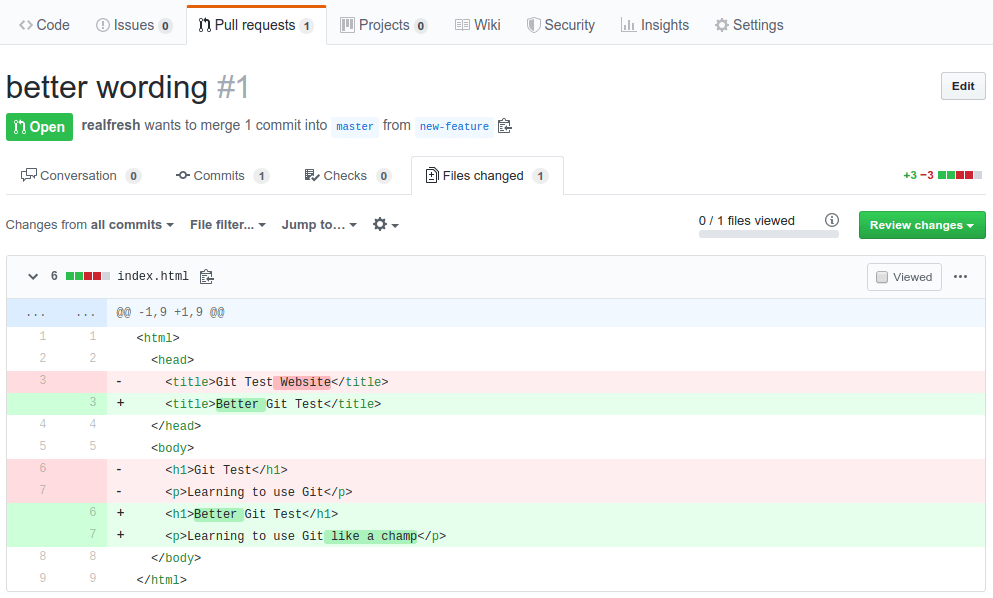
Your pull request is official at this point. Everyone can discuss and view the changes you proposed.
Let's switch back to being yourself now instead of your friend. You are now notified that your friend has proposed some changes. You navigate to his pull request on your GitHub repo. You can easily view the exact modifications he suggested.
You are satisfied with his work and decide to give it the green light. On the main page for the pull request, just hit the green "Merge pull request" button. If your code and his code had conflicts, GitHub would notify you about these conflicts and ensure they are resolved before you can proceed with the merge.
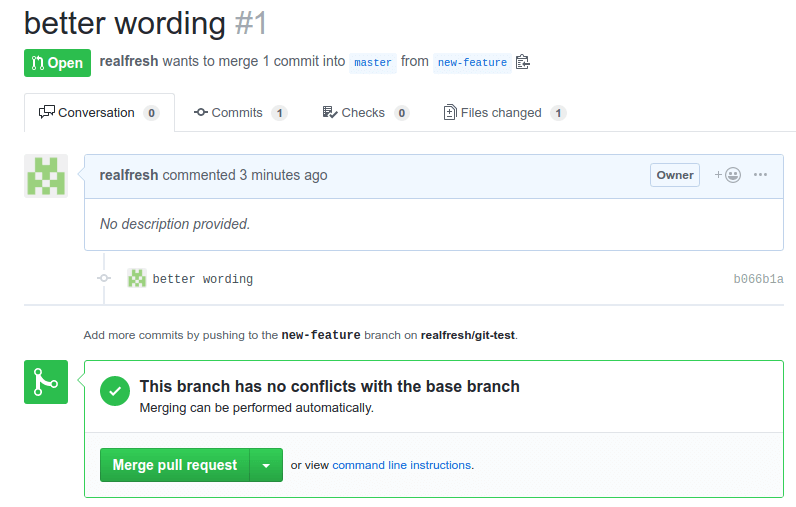
You will need to confirm the merge with a title and description. Once merged GitHub will let you know that the new-feature branch is no longer needed and can be deleted. Go ahead and press the "delete" button.
If you head back to your main GitHub repo page, you will see the files have updated as per your friends suggestions. If you press on the "3 commits" at the top of your GitHub repo, you will see a list of all the changes that took place.
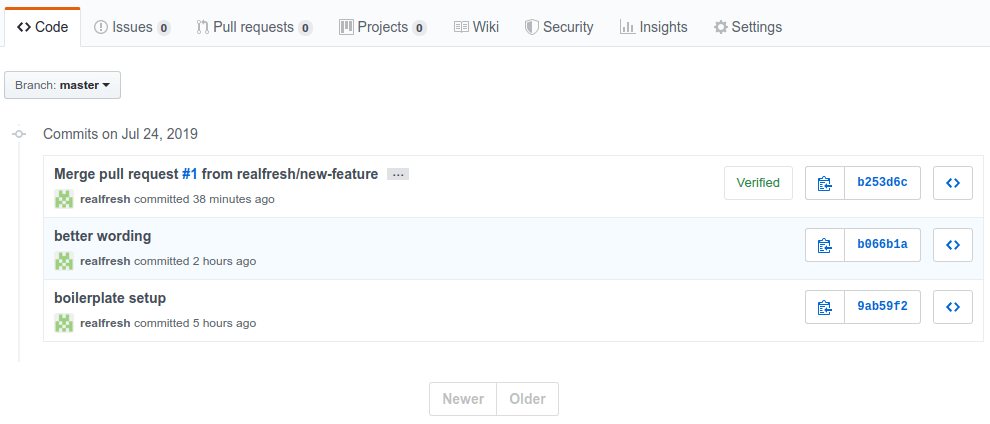
This includes your friend's commit plus the pull request merge that just occurred.
Sync those updates back to your original repo
Now let's switch back to your original git-test folder you created on your PC, not the cloned one. To do this, we can run
cd ../git-testAt this point, your original repo folder still has the old files before the "better wording" commit your friend created.
Say you too have also been working on some changes to the index.html file. Before you did this, you created a new branch for your updates. Let's create this branch, call it updates and switch to it.
git branch updates
git checkout updates
Now copy and paste the code below into your index.html file
<html>
  <head>
    <title>Git Test Example Website</title>
  </head>
  <body>
    <h1>Git Test</h1>
    <p>Learning to use Git</p>
    <button>Bang</button>
  </body>
</html>
This code has had its <title> changed and a <button> has been added in. Once you are happy with the file, you commit the changes with the following commands
git add .
git commit -m "added button and changed title"
Before syncing your friend's changes from the GitHub master branch to yours, let us first merge your changes on the updates branch with the master branch on your local repo. Change back to the master branch first with
git checkout masterNext, we will run the following command to merge your updates branch into the master.
git merge updatesThis merge is exactly what took place when you accepted your friend's pull request. In that case, GitHub merged the branches for you. Here, you are merging the branches locally on your PC. The output of the merge command will show the following
Updating acb6655..502d5b2
Fast-forward
 index.html | 3 ++-
 1 file changed, 2 insertions(+), 1 deletion(-)
Git used what is known as a "Fast-forward" merge. Since your local master branch has remained the same all along, Git knows to simply use your new updated index.html. The code in the master branch can just fast forward up to your new branch changes. After this merge, our index.html file will now contain the changes we made in the updates branch.
Had we changed the master branch, Git would ask us to resolve conflicts as it no longer knows which code is the right code. We will soon see this take place.
At this point we can delete the updates branch by typing
git branch -d updates
#Deleted branch updates (was 502d5b2).
We are now ready to merge your updated GitHub repo with your local repo. To do this, we use the git pull command. The git pull command will fetch the latest changes from your origin remote master branch and then merge them in with your local repo master branch. So let's run
git pullThe output of the command will be
remote: Enumerating objects: 6, done.
remote: Counting objects: 100% (6/6), done.
remote: Compressing objects: 100% (3/3), done.
remote: Total 4 (delta 1), reused 2 (delta 0), pack-reused 0
Unpacking objects: 100% (4/4), done.
From https://github.com/realfresh/git-test
   acb6655..b52c1b2  master      -> origin/master
 * [new branch]      new-feature -> origin/new-feature
Auto-merging index.html
CONFLICT (content): Merge conflict in index.html
Automatic merge failed; fix conflicts and then commit the result.
This is telling us that Git detected a conflict in the code between your local repo and the GitHub repo that was updated by your friend’s pull request.
The issue is Git has detected that both you and your friend modified the same code. It can no longer tell which code to keep and which to discard. This is a conflict.
Before we can complete the merging of the GitHub repo with ours, we will need to resolve these conflicts. Opening your index.html file in a text editor will reveal the following
<html>
  <head>
<<<<<<< HEAD
    <title>Git Test Example Website</title>
  </head>
  <body>
    <h1>Git Test</h1>
    <p>Learning to use Git</p>
    <button>Bang</button>
=======
    <title>Better Git Test</title>
  </head>
  <body>
    <h1>Better Git Test</h1>
    <p>Learning to use Git like a champ</p>
>>>>>>> b52c1b28681ac56b77375fe29af3655b889bc1ae
  </body>
</html>
Git is showing us the section of code that is conflicting. The code below HEAD is our local code and below it is the latest code the GitHub repo containing the "better wording" commit. In our code we added the button and changed the title. In the remote repo code, there is no button and the wording is different.
To fix the conflict, we would need to remove the conflict markers (<<<<<<<, ======= and >>>>>>>) and fix the code to what it should be. In this case, we can include the button and decide which wording to use. Your final result might look like this
<html>
  <head>
    <title>Git Test Example Website</title>
  </head>
  <body>
    <h1>Better Git Test</h1>
    <p>Learning to use Git like a champ</p>
    <button>Bang</button>
  </body>
</html>
Once we are happy with it, we would need to add, commit and push the changes like this
git add .
git commit -m "merged with origin master"
git push origin master
At this point, the GitHub repo will be back in sync with our local repo. If your friend was to make any changes after this, it would be important for him to run git pull and sync his local repo with the updated code on GitHub.
Re-capping the above Git functions
The above steps took you through the process of
- Creating a Git repo
- Backing up your files on GitHub
- Making isolated changes
- Sharing code with others
- Collaborating on projects
- Keeping things in sync
There was definitely a lot to take in. This is a quick recap of the commands we used.
| Command | Description |
|---|---|
| git init | initialize a new repository in a folder |
| git status | overview of repo including current changes |
| git add . | add all changes to be tracked |
| git commit -m "message" | commit tracked changes |
| git log | view log of all commits |
| git remote origin https://... | link a remote repo to your local one and call it origin |
| git push origin master | push changes to the master branch of your origin remote |
| git branch new-feature | create a new feature branch |
| git checkout new-feature | change to the new feature branch |
| git merge new-feature | merge the new-feature branch to your current branch |
| git pull | pull changes from origin remote and merge to local repo |
These are effectively all the commands you need to know to be productive with Git.
Git workflow strategies
If you completed the above tutorial, you should be familiar with the basics of using Git and it's common functions. The purpose of this section is to put all the skills you've learnt into useful strategies for different situations.
How you use Git will depend largely on the context you use it within. Different contexts require different workflows with Git. So lets explore how we might use Git in some common situations.
Starting a new project
- Initialize a new repo for every project folder with
git init - Add our initial files for the project
- Track and commit the files with
git add .andgit commit -m "<message>" - Create a subsequent GitHub repo, link it with
git remote origin <repo_url> - Push initial files to GitHub with
git push -u origin master
Cloning an existing project
Used when joining an existing software project or if you need a copy of your project on a new PC
- Clone the project repo onto your PC with
git clone https://... <folder_name>
When making updates as a solo developer
- Run
git pullto ensure your starting copy is in sync with the latest changes - Create a new branch with
git branch <branch_name> - Switch to the new branch with
git checkout <branch_name> - Update our code
- Run
git statusto review updates - Once reviewed, add and commit the updates with
git add .andgit commit -m "<message>" - If needed, backup your work with your remote repo using
git push origin <branch_name> - When changes are finalized and committed, switch back to master branch with
git checkout master - Merge new branch into your master branch with
git merge <branch_name> - Resolve any conflicts if they arise and re-commit if necessary
- Push updated code back to your GitHub repo with
git push origin master
When making updates in a team
- Run
git pullto ensure that your work is synced with your peers - Create a new branch with
git branch <branch_name> - Switch to the new branch with
git checkout <branch_name> - Update our code
- Run
git statusto review updates - Once reviewed, add and commit the updates with
git add .andgit commit -m "message" - Push your branch to the GitHub repo with
git push origin <branch_name> - When all changes are finalized and committed, go to GitHub and create a new pull request
- In the pull request, merge your new branch with the master branch
- Let your team leader review the changes, make suggestions as needed and accept the request
Open source projects
Open-source projects operate a bit differently. Mainly because you won't be granted write access to the main GitHub repo. As such, when creating updates, you cannot push updates on a new branch. Meaning there is no way to create a pull request between your new branch and the master one.
This is where the GitHub concept of a fork comes in. By creating a fork, we can get our own independent copy of the open source repo. GitHub will allow you to submit a pull request between your fork and the original repo. This is how we contribute suggestions to an open-source repo and how others may contribute to ours.
- Fork the GitHub repo using the "Fork" button on the top right of a repo
- Clone your fork locally and make changes as you usually would
- Push those changes to your forked GitHub repo
- Create a new pull request and use the "compare across forks" option to create a pull request against your forked copy
- Wait for repo maintainers to review your changes and accept your pull request
Where to go from here
I hope this guide has served you well. Hopefully it cleared up any confusion you have around Git or GitHub. I hope that it's finally starting to make sense.
If you haven't already, definitely adopt Git into your daily developer workflow. This is when it really starts to make sense and you realise the benefits. You will naturally become familiar with Git as you start to regularly use it. So don't stress if you feel overwhelmed by all the information. Over time, it will all come together.
Check out my article on GitHub Releases if you want to learn more about that topic.
Otherwise, there are tons of useful resources to help you better understand Git. Here are the ones I would recommend checking out.
- https://try.github.io
- https://www.atlassian.com/git
- https://learngitbranching.js.org
- https://www.pluralsight.com/courses/code-school-git-real
- https://www.youtube.com/watch?v=1ffBJ4sVUb4
I would recommend staying away from the longer form corses on Git, such as the ones you find on Cousera or Udemy. The reason is that these go into way too much detail. You don't need to be a Git master to be proficient. All you need to learn is the basics and how a few commands work. Your time is better spent learning to build applications then worrying about how Git works precisely.
On a final note, if you think this guide is missing anything or you notice something incorrect, let me know in the comments and I will look into it.
Comments